Happy Birthday Ginny and Amy!
Two of our friends in our small group are celebrating a birthday this week. So for small group we decided to do a little par-tay.
So naturally that means it's time for something extra special. Something you can't get "just anywhere."
This was a two-day process since the cake needs to chill for 8 hours (after baking for 1 and a half hours and cooling for about an hour). I'll be honest, one of my bajillion cookbooks just might have a recipe for this but I did the easy thing and googled it. I found this recipe from Southern Living 2004 and went for it.
After a few trips to the store (I seem to have lost my brain somewhere along the walk to Target and forgot some ingredients) I was on my way to Red Velvety goodness.
So naturally that means it's time for something extra special. Something you can't get "just anywhere."
Red Velvet Cheesecake.
This was a two-day process since the cake needs to chill for 8 hours (after baking for 1 and a half hours and cooling for about an hour). I'll be honest, one of my bajillion cookbooks just might have a recipe for this but I did the easy thing and googled it. I found this recipe from Southern Living 2004 and went for it.
After a few trips to the store (I seem to have lost my brain somewhere along the walk to Target and forgot some ingredients) I was on my way to Red Velvety goodness.
First we make the crust. Your classic graham cracker and butter mess pressed into the pan. I couldn't find chocolate graham crackers so I used chocolate Teddy Grahams. Just as good! I didn't take photos but my trusty sous chef, Chris mixed melted butter with this and pressed it into the bottom of the springform pan.
Mix the cream cheese with sugar.
Then add the eggs, vanilla, sour cream, cocoa, buttermilk and a little bit of vinegar. I've read in my research that the vinegar and buttermilk are added to help the red food coloring really pop. In this case: it worked!
Mix 'er up!
Add two 1-ounce bottles of red food coloring to make it really, really red!
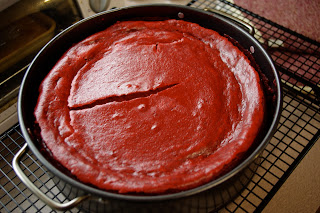
Pour into the pan over the crust and bake in the oven....10 minutes at 325 then 1.5 hours at 300 or until the center is firm. At this point it really looks like red paint!
It took quite a bit more cooking to get to the 'firm' center. About 25 more tonight. Never be afraid to use your senses and say "hey, this isn't quite right, I need to cook it for longer." These recipes are often tested in professional kitchens, not on 15-year-old electric stoves from Sears.
After the long cooking time we turn the oven off and leave the cake in there for another 30 minutes....then cool it on a rack for 30 more minutes. THEN....cover and cool for at least 8 hours. So this recipe is a two-day process.
Here it is on the cooling rack. The crack is the bane of cheesecakes...I know that they typically happen when the cooling process is done too quickly. I might be more careful next time and leave it in the oven (with the oven off) for a little longer. In any case - this will be covered with the topping so it's no matter.
Day Two! The cheesecake has been in the fridge over night and it is time to make the creamcheese frosting for the top. This uses 3 ounces of cream cheese, 1/4 cup of softened butter (half of a stick) mixed together and then gradually add a cup and a half of confectioner's sugar. ALWAYS sift your sugar...you avoid clumpy spots by sifting it. I prefer the sifter above to the squeeze handle sifters. It's easier to use and muuuch easier to clean.
Here Sous Chef McChris is adding the sugar, ever so slowly.
And little miss Fenway is always checking things out!
After we 'frosted' the cheesecake, Chris pointed out that we really should make more to get nice, smooth coverage. So we ended up making a double bacth of the cream cheese frosting. It was the right decision.
When you're about to eat Red Velvet Cheesecake you need to have a light meal so as not to put yourself into sugar shock. We had chicken caesar salad tonight. Though, Chris doesn't have a sweet tooth so he ended up eating a bite. I, on the other hand, polished off a whole slice.
And here is the cake on the stand. The bottom layer is that Teddy Graham/Butter Crust then the red velevet and the cream cheese frosting top. Gorgeous.
A perfect, *rich* slice.
Happy Birthday Ladies!!


Comments
A lot of love went into this. You're a great chef and friend.